
With an unexpected growth in numbers of people working from home, teleconferencing for meetings is more popular than ever. Which means, of course, that many people are having video meetings for the first time. You wouldn’t show up to a face to face meeting with a client mumbling and looking scruffy, so you probably want to take the same care to make sure your video self looks and sounds professional. Here are our quick tips which will make the world of difference.
Lighting
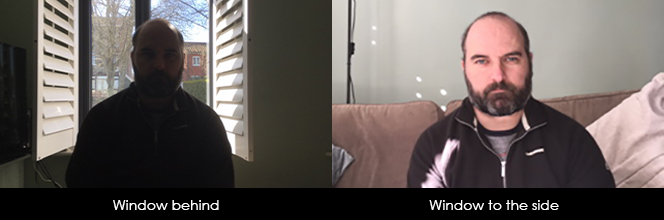
Tip 1: Windows
The human eye is an incredible thing – we can see reasonably well in the dark and we can cope with both bright and dark things in our field of vision at the same time. Cameras, however, need a bit more care. They need enough light to make a good image, but not too much. One mistake we see frequently is people sitting in front of a bright window, which invariably turns them into a fuzzy dark blob. Simply positioning the camera so that you’re either facing the window or have it on one side of you will dramatically improve the picture.
Tip 2: Artificial light
If you don’t have a suitable area for your video conference near a window, don’t forget that the camera still needs light! By all means turn the room lights on, but if they are all overhead lights this can create nasty shadows, especially if you have LED or halogen downlights. Using a table lamp or reading lamp as a more direct source of light can make a huge difference.
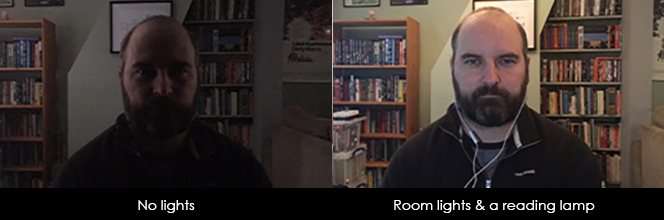
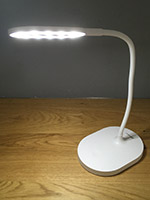 The difference in the shots above was made by an overhead bulb in the room and an inexpensive LED lamp like the one on the right.
Try to put your lighting at around eye level or just above. If you light yourself from below, you start to get some very odd shadows!
If you have light coloured walls, you can get a nice soft lighting effect which minimises shadows by bouncing the light off the wall rather than pointing it directly at your face.
Audio
Tip 3: Headphones and microphones
Audio quality is even more important than video quality. If you can hear someone but are having trouble with the image, you can still have a conversation, but if the sound is poor then it’s way harder. Microphones work best when they’re quite close to the source of the sound – in this case, that’s your mouth. That means that if you’re sitting a couple of feet from your webcam, like you should be, you’re also a couple of feet from your microphone.
This 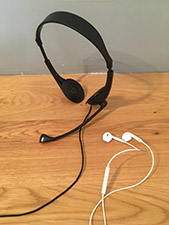 can be fixed by using a separate microphone. While you probably don’t have a high quality microphone, you may well have a headset with a mic, or even in-ear headphones. If you can plug them into your phone to make a call, you can use them on a video conference.
The huge benefit of both these options is that they get the mic much closer to your mouth. But there’s another benefit as well. That webcam microphone is probably picking up the sounds coming from your speakers, and that can cause an echo or feedback noises. When you wear headphones, you remove that problem, so even if yours don’t include a microphone, you should always wear headphones when you’re on a video conference call.
Tip 4: Ambient noise
A lot of people don’t think about background noise when they’re recording or taking part in a video conference, but microphones can pick up all kinds of extraneous noise. Make sure that kids and pets are busy in another room before you start, and wait to run the dishwasher or washing machine until after the call – you’d be surprised what a difference it makes.
You can also cut down on background noise by not wearing jangling jewellery like bangles or necklaces that might be picked up on the microphone, and by taking notes on paper instead of typing while on the call. Many video conferencing platforms have a button to mute your microphone if you need to cough or make some other noise, and it’s a great idea to start out on mute while you’re getting set up so that nobody else can hear your frustration when you’re trying to get everything ready!
Finally, and most importantly, never EVER eat while you’re on a video conference!
Framing
Tip 5: Positioning yourself in the frame
In video production in general, there’s something called ‘the rule of thirds’. Basically, imagine the screen split up in thirds both vertically and horizontally, like a noughts and crosses grid.
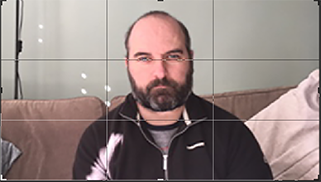
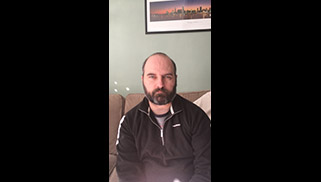
As you can see, my eyes are roughly on the top grid line. This generally means there’s not too much space above my head, and the picture tends to look good if you follow this rule. When someone is being interviewed, and is looking off to the side of camera, you’ll almost always see them sitting to one side of frame – that’s what the vertical grid lines are for – and it makes the image much more comfortable to look at. You can do that if you want, but when you’re looking straight into the camera it’s fine to be in the centre of the image.
If you do sit to one side, make sure it’s just off-centre, as sitting all the way over on one side looks odd. Also, make sure you’re sitting far enough away from the camera that there is a bit of space above your head (‘head room’) and a bit below your shoulders – mid-bicep is usually a good cut off point.

Remember that you’re on camera the whole time, so try not to get distracted or do anything that might distract other people in the video conference. Don’t try to multitask, checking your phone or emails, don’t fidget or roll around in your wheeled chair. And again, never ever eat.
Tip 6: Camera height
If you’re using a laptop on the desk in front of you, the webcam is likely to be slightly below the level of your chin. This means that to get your face in frame, it has to be tilted upwards, which isn’t a great angle. Rather than giving your viewers a shot of your ceiling and an unintended view up your nose, try raising the laptop up on, for example, a pile of books.
If you raise it high enough that the webcam is roughly level with your eyes, you get an image much closer to what someone would see if they were there with you in the room, and that works out better for everyone.
Tip 7: Orientation
We’re advocates of using the right video orientation for the right platform, and we’ll even reluctantly admit that there are times that portrait mode can be good for certain social media platforms. If you’re using your smartphone for video conferencing though, ALWAYS set it up in landscape mode. Apart from looking much more professional, and allowing you to frame the image without too much head room, landscape mode will mean your image is much larger and clearer for the other participants as well, because the video conferencing software will have to put black bars or something similar on the sides of the image.
When in person meetings aren’t possible, video conferences are the next best thing, and if you follow our tips you’ll be able to look and sound as professional as possible, even when you’re working from home.
If you would like to talk this through and discuss options on how this would work for you please do not hesitate to give us a call. We are more than happy to provide advice and suggestions for you.
viagra 500